Reviews
Hair Extension Review
I was skeptical about hair extensions. I could envision it going VERY wrong VERY fast. I’ve heard stories of tape in, glue and who knows what else, damaging hair. But Clip-in Extensions?! This I had to look into! The more I looked, the more convinced I became. Sure! Why not?! I decided to try it for the versatility, economics and fun. I like options without the longterm commitment of extensions that are adhered in a more permanent way. And it’s “better” for the health of your hair while giving you “change options”.

So here’s what I did. I brushed my hair out thoroughly, then detangled and put in a little “smoothing serum” on the tips to smooth out before I started the process.
~Considerations~
Brand: I chose Pro Extensions. I saw the color that seemed pretty close to my own color. Made from 100 percent Grade A human hair with claims of easy application (even women with no previous experience) Unlike weaves, tapes or glues, clip-on extensions allow you the freedom to put in and take out the hair extensions as often as you like.
Color: I chose a platinum/dark blonde combo and was pleasantly surprised. It matched perfectly. BUT if it had not been the right color, (because each set of extensions is made from human hair), they can be styled and dyed just as you would your natural hair. I also liked the polymer-coated clips because they attached securely and did not damage my natural hair. They did not slip out or move around.
Now, The “How To”:
Brush your hair to make sure its easy to section off with a comb.


2. Section your hair into 3 portions. Sides and back. Then section the back into three portions. Always leave 1/2 -1″ at hairline free of clips.
“Open” clips and arrange hair on the counter in the chronological patten you will put them in. Keep the front and sides of your hair pinned up. Start with the back. keep all hair clipped up so you can work on one section at a time without any tangle issues. Move from bottom of the hairline upward. Then go to your sides above your ears. I did 3 singles on each side, keeping all clips on the lower half of my head. Use a comb to make straight part lines before each addition. If your hair is fine, you may need to tease the roots of your hair for the clips to get a good grip. Since my hair is more coarse, I did not do that. If you can avoid that, I think it keeps it easier to comb and manage.


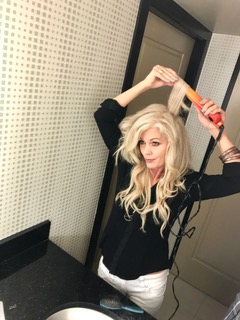
Use a flatiron or curling iron to blend the end of your hair with the extension hair. Voila’! Enjoy the length for a new look.
Pros: Versatile, Easy to clip-in & out, Economical, Awesome when wearing hair down.
Cons: Clip-ins are not super comfortable while laying down. Not able to wear hair up too high on your head comfortably since the clips are shaped to adhere to the shape of your head. It just feels funky and odd. (You may be able to put them in upside down to wear hair up. This seems a bit tricky, but I may try it.
Overall, It’s fun to have the versatility of extensions. It’s a great option for a different look without commitment. 😉
Clip in & clip out!


What? No props to the photographer? 😉 (You always look beautiful to me, baby.)
oh my! How could I forget to mention the sexiest photographer on the planet!!!! Thanks, babe!
smooches! Lots of smooches for you!